

We’re so used to having clean water on tap. We start our day, take a quick shower, brush our teeth and pour ourselves a hot boiling cup of tea. But most of us don’t realize just how much water a day we actually use.
The Conscious Mind
Thoughts & Musings
Water kefir is a light, naturally fermented, effervescent probiotic beverage with a diverse range of flavors and textures. Depending on how you prepare it, your water kefir can be sweet or sour with a texture ranging from light and sparkling to deep and yeasty.
It can even become a little bit alcoholic which may be of interest to some (around 0.5% or more depending on how long you ferment it and conditions).
Water kefir is made by mixing water kefir crystals or “grains” with water and sugar, and allowing the mixture time to ferment. These grains are actually Symbiotic Colonies Of Bacteria & Yeast (aka, SCOBYs), and come in the form of beautiful, translucent-jelly-crystals. In the right environmental conditions they can more than double in quantity every day!
Water kefir grains thrive on a mineral and carbohydrate-rich liquid diet. They can live in sugar water, fruit juices, coconut water, in soy/almond/rice milk, or even honey. Adding whole fruits to your kefir can give your SCOBYs a natural yeast boost, and enhance the flavor.
These little grains metabolize sugars into beneficial acids, releasing B vitamins and other healthy enzymes which aid digestion and nutrient absorption.
This video explains why a healthy gut is good for you.
When making water kefir, there are generally two phases of fermentation. During each phase, the probiotic concentration of your kefir increases and the sugars you have added decrease as they are consumed by the kefir cultures. Kefir fermentation is anaerobic, which means that no oxygen is required for your cultures to work their magic.

This is the first phase of fermentation, and takes place with your kefir grains present in the solution. During this phase, your ferment’s flavor and texture is heavily influenced by any fruits or roots present.
Fermentation proceeds at a faster rate, due to the large population of microorganisms (kefir grains) present.

This phase begins after the kefir grains are removed from your kefir. Your beverage will continue to ferment due to the invisible bacterial cultures still present.
Often additional sugar-source (i.e. syrups, fresh fruits, jam) is added during this phase and in a closed vessel or bottle so that carbonation can build.
First off, make sure you get WATER KEFIR grains. There is a difference between milk kefir and water kefir grains, and they are not interchangeable.
Next up, you’ll have to decide if you want powdered, dehydrated or live kefir grains.

Powdered Kefir Grains
Powdered kefir has unlimited shelf-life and is ready for immediate use. However, it generally isn’t able to reproduce for more than a few batches of kefir. You will have to keep buying more.

Dehydrated Kefir Grains
Dehydrated kefir grains have a nearly unlimited shelf-life, but you need to rehydrate them for a few days before you can use them. Once they’re out of “hibernation”, they will multiply indefinitely.

Hydrated / Live Kefir Grains
Live kefir grains are delivered in a sugar-water solution. They don’t live indefinitely without regular care, but they are ready for immediate use and will multiply, providing you with a lifetime supply of kefir grains.
If you’ve purchased dehydrated water kefir grains, you will need to “activate” (aka rehydrate) them first.
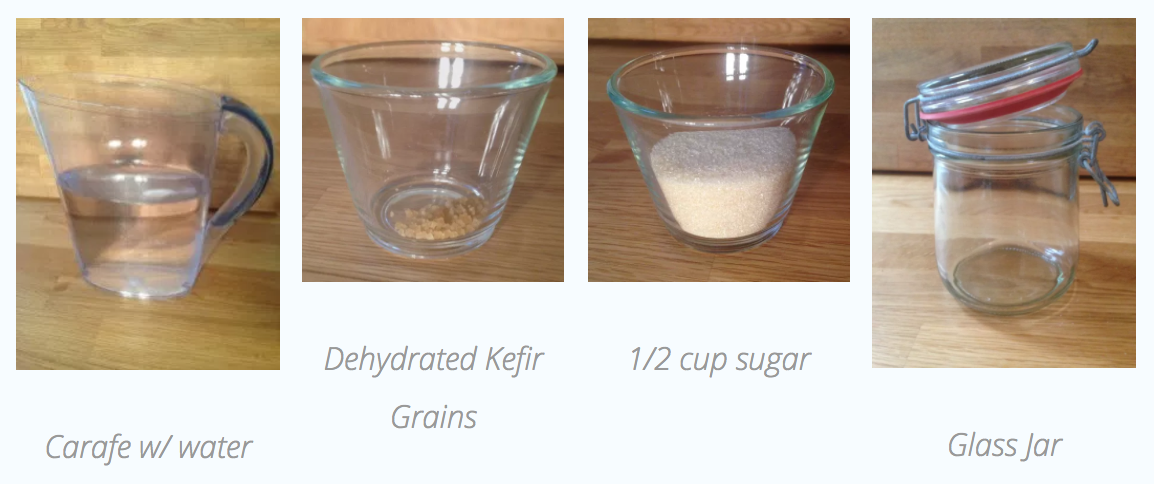
You will need:
1 tablespoon dehydrated water kefir grains
4 cups (1L) of boiled & warm water
½ cup (100G) of sugar (raw cane sugar, white refined sugar is fine, jaggery, coconut sugar, maple syrup, honey, agave syrup, rice syrup, barley malt)
Instructions:
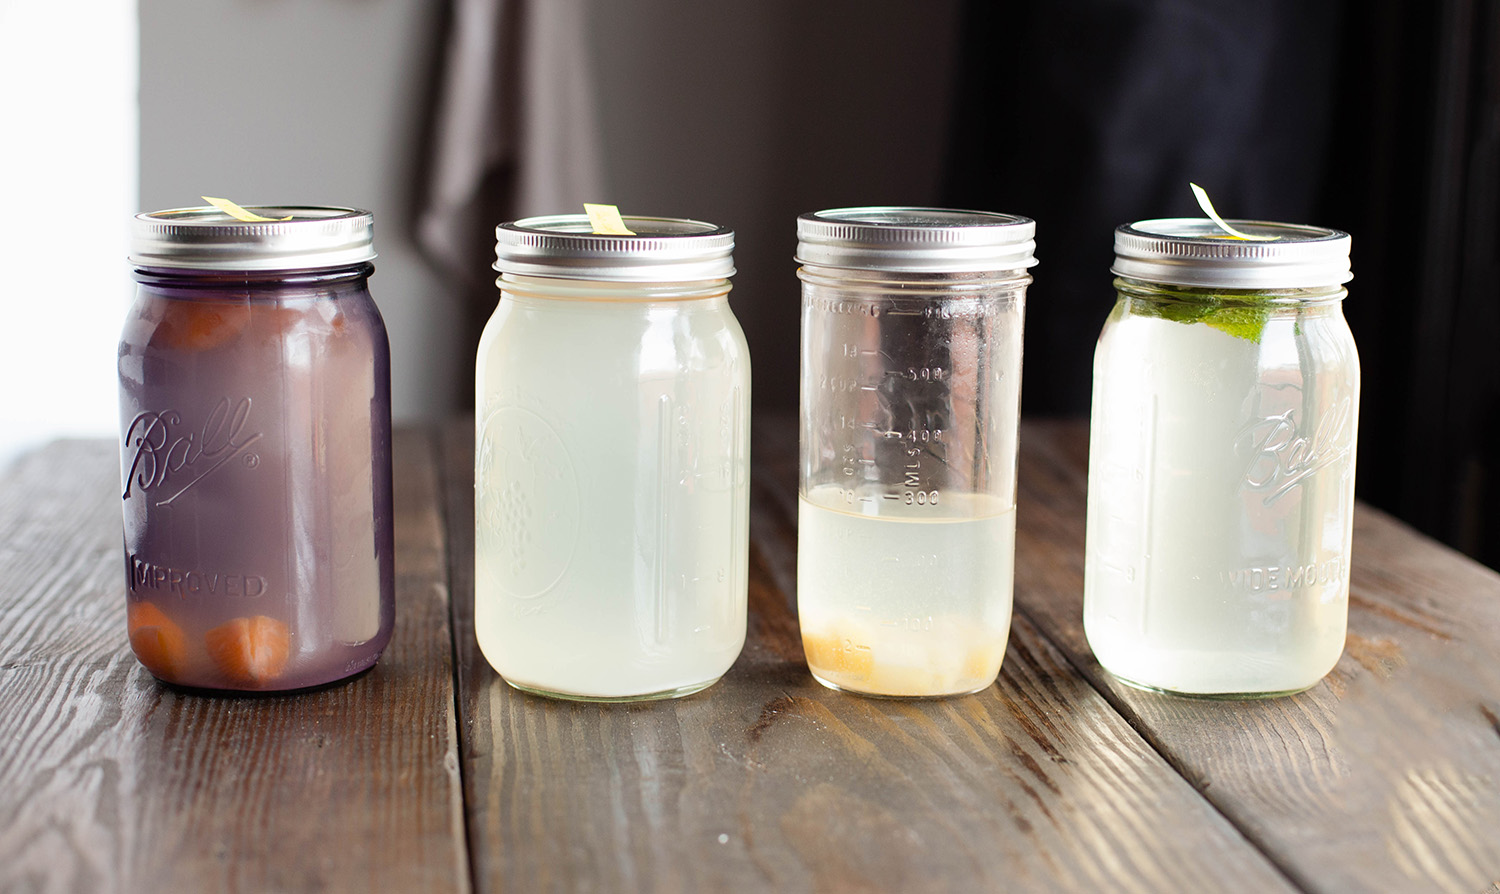
Now that you have your live, hydrated water kefir crystals, it’s time to make your first basic water kefir! (I'll be making one of my favorites - a refreshing fig-lemon-goji berry tonic.)
You will need:
1 tablespoon active (hydrated) water kefir grains
4 cups (1L) boiled & warm water
½ cup of sugar (raw cane sugar, white refined sugar is fine, jaggery, coconut sugar, maple syrup, honey, agave syrup, rice syrup, barley malt)
Dried or fresh fruits & roots for flavoring (for example: dried figs, cherries, lemon slices, apple slices, sarsaparilla, fresh ginger, goji berries, dates, etc)
(Optional) Flavored syrups, juices and extracts (lavender, vanilla, apple juice...)

Instructions:
1. Make your sugar solution. Add ½ cup (100g) of sugar to 4 cups (1L) of boiled, still warm water in a jar or plastic bottle. Stir till sugar is completely dissolved. Allow the sugar-water to cool to room temperature.
2. Add active kefir grains. Once the sugar water is completely cooled (again, hot water can kill your kefir!) add 1 tablespoon of active kefir grains.
NOTE: the more grains you have, the faster they digest available sugars, thus the faster your kefir will be ready. You may need to add more sugar and water.
3. Add dried and fresh fruits. The extra yeasts from the skin of the fruits help the fermentation process as your kefir grains eat the sugars and create more carbonation while adding fruity natural flavours.
4. Seal your container. Water kefir grains do not need oxygen to survive (like a kombucha SCOBY does), so your vessel can be sealed or lightly capped. The tighter the cap, the more carbonation builds up. I use a wide mouth jar so i can get fruit and the grains out and in more easily than a bottle neck
NOTE: over-carbonation can be dangerous, especially in glass containers! Open the cap every 1-2 days to release air-pressure and to avoid explosions.
5. Watch your ferment. After 48 hours, the fruit that sank to the bottom of your jar should now be floating at top. This means carbonation and fermentation are happening!
6. Pour the flavorful, effervescent liquid into a bottle while straining out the kefir grains.Place your grains in another sugar-water solution. These happy fellas have probably doubled in quantity, and are ready for your next ferment.
NOTE: You are what you eat, and your water kefir grains are no different. Expect them to change color according to the sweeteners, flavours and added ingredients you ferment them with. When you use hibiscus tea and honey to make a ferment it changes the grains pink!
7. The liquid product, now separated from the grains, is “Water Kefir’ and will continue to ferment and carbonate in the sealed bottle (secondary fermentation). This beverage can be cooled and enjoyed as is.
Optionally, you can enhance it further with herbs such as mint and cardamom, sweeteners such as sugar or honey, and various flavored syrups. You can even use it as a “starter” for other sodas & vegetable ferments, or instead of yeast for baking... the possibilities are limitless!
NOTE: Your final beverage will have MUCH fewer calories than your initial ferment. Water kefir feeds on sugars, digesting them and releasing CO2 (carbonation) in the process. Water kefir bacteria can eat maple syrup and agave syrup, unlike kombucha cultures. Sugar-free sweeteners such as stevia will NOT feed your kefir, but feel free to add it to your finished product for an low-calorie sweet taste!
Now that you have the basic recipe for making water kefir, it’s time to start experimenting!
Every water kefir has 3 variables:
Interested in reading more? This article was inspired by https://ediblealchemy.co/water-kefir/ Check it for further inspiration!
Its aroma is irresistible. So many people cannot imagine starting a day without it. Is coffee flawless in its perfection? Like a modern-day beverage of the Gods... or should we consume it mindfully?
With less than 10 minutes preparation time this nourishing salad is ideal for the days, when it has to go quick and you don’t want to make big mess in the kitchen. Get all the autumn flavors in one dish!


Summer is hot, bright and sharp (pitta), and it boots most people’s energy levels and speeds up their metabolism. According to Ayurveda, the food that we put into our bodies affects our entire well-being, so it’s important to read up on our prakruti. Everyone has a specific balance of the three doshas.